Posts

Showing posts with the label free pattern

Easy Drawstring Bag Tutorial

Image
Struggling with Blogger. Honestly,  I thought that the problems I had were with the computer and  now a new computer and it does the same things.  I cant center the pics  but here goes.  I needed something quick to make and sell that we use up  the  hoard I mean stash of material that I have acquired, My mom told me about a woman that had these  at a craft show and how well they were selling.  As any of you know that I have read my ramblings,  I don't get real precise with measurements... who needs all that structure in their life anyway.  So,  take your piece of material and cut it into manageable bag sizes.  Keep in mind that I folded these so that there is only a bottom and side seam so make allowances for that in your cutting.  After zig-zagging at least 15 of these,  I decided to pink them instead,  because really,  stash busting...

Spring Tag Free Tutorial

Image
These are about the easiest and least expensive craft EVER!   I am really not sure I NEED this many of these but once I got going, I could not quit!   So you will need:   Laminate samples Paper Xacto knife White Glue Sanding block Antiquing or paint or ink pad Leftover ribbon scraps   Now, first of all, I am not going to condone stealing laminate samples from your local Lowes or Home Depot, but hey, you just might want to change out that countertop someday and some samples would be helpful!   Mine, however came from Pittsburgh Center for Creative Reuse   http://pccr.org/   for $5 for a huge bag of them. If you have never been there, it is worth the trip.   I always find something to bring home!   Not that I haven't needed samples just in case I want to change my countertop.. in the past.   And the print on the paper? I found it at: ...

T-Shirt Scarf Tutorial

Image
OK,  We are counting this as Number 8. Back to business here. And The deal I made with myself. I cannot keep pinning things on Pinterest without doing some of the things that I have pinned. So, that being said, I will share the way that I made this. There are tons of tutorials out there. I think that I have them all. Here goes with another. I literally made this, start to finish, in 1/2 Hour. Start with t-shirts or as in this case, tank tops. Being in the screenprinting business affords me the luxury of lots of brand new, misordered shirts. More than I like to admit. Cut them into five inch strips. Then five inch squares. If you don't have a rotary cutter, this might take a little longer. Stack them up. And start sewing point to point. Lay each one down where the point ends on the one behind. I stretch stitched, but you could use a zig zag or even a straight stitch. You can make this as long as you want. You could even use bigger or smaller squares, and the color possibiliti...

Joy Ornament Tutorial

Image
To all those looking for humor, or before and after pics, you will just have to wait. This is a crafting post! You will need:  Wood Rectangles (I bought a huge pack of these at a craft supply place, not knowing what I was going to do with them) Twine Mini Clothespins Rusty Jingle Bells Decoart Americana Sap Green Cocoa Antique White Heritage Brick Black White Regular Painting Supplies Base the rectangles with the Sap Green. I blended a little of the Antique White on the upper right hand corners. Allow to dry and sand lightly. With Cocoa on a round brush (6) paint the letters. You don't need a pattern for these, just paint them. Highlight on the upper and right sides of the letters with Antique White using the same round brush. With Heritage Brick on a liner brush, paint in the stripes. Shade the lower and left sides with Black on the same liner brush. Highlight the letters with White on the right sides. String four jingle bells on the twine. (Honestly, this was the ha...

Wool Owl Tutorial

Image
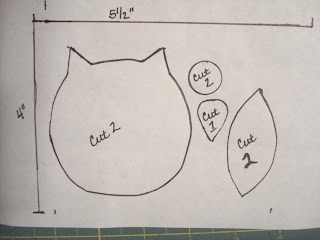
 You will need: Lightweight cardboard or card stock Freezer paper Scraps of felted wool or other fabrics. Small amount of embroidery floss Small amount of Polyfil Regular sewing supplies. 2 small buttons. and a short amount of time! If you right click on this picture and copy it to your computer you will then be able to print this out for your pattern. I am not sure about the sizing.  You may have to play around with that. Sorry, I am not a computer whiz! I always use a circle template for my circles.  Trace the pattern pieces onto heavy card stock or lightweight cardboard and cut out. Then trace them onto freezer paper. Head on over to your stash of wool. Mine just happened to be still laying on the floor from the last project. And pick out your colors... then iron the pattern on to the wool. The waxy side sticks just enough. Cut out all pieces. (That is my favorite part) Begin blanket stitching everything down.  I start with this side and go to the othe...

Free Rolling Bunny Tutorial/Pattern

Image
 You will need: Poster board or lightweight cardboard Freezer or Butcher Paper Scraps of felted wool Two buttons Embroidery floss Small amount of Wool Roving Small amount of polyfil Tools: Scissors Embroidery needle Felting needle Trace this pattern and cut out of lightweight cardboard.  Trace onto freezer paper, two of body, two of head and one of blanket. I flipped the head, but that is not necessary if your wool is the same on both sides.  Iron onto wool with the wax side down, hot setting on iron and no steam.  Cut out pieces and blanket stitch the blanket onto one piece of the body.   Beginning at the right side of the blanket start stitching down the top of the back and around the foot area.  Sew the button on and then stitch up to the middle of the bottom and stuff that side with polyfil.  Finish stitching around, repeating adding the button to the other side, leave a small opening at the blanket and finish stuffing the other leg and close u...