Walker/Wheelchair Bag Tutorial
Some of you asked for this. This is literally one of the EASIEST, most appreciated projects that I have ever made. I timed myself while I made this one and it was finished in under 1/2 hour and that included refilling bobbins, taking pictures, and searching the button box for two matching buttons. They are even faster if 1.) you don't do all of the above and 2.) you make them on an assembly line.
Step 1. Cut a piece of fabric for the straps 4 inches wide by 14 or so inches long. If you have a very lightweight fabric, you can double it or use press on interfacing to back it.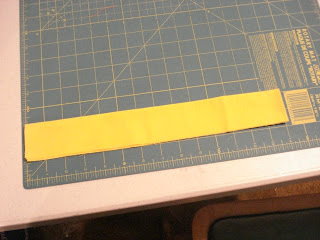 Step 2. Cut two coordinating rectangles approximately 12 to 15 inches by 15 to 18 inches. This is very loose, you can use vary the size of them. Pin those together on the bottom and halfway up the sides.
 Step 3. Press the 4 inch rectangle in half lengthwise with wrong sides together and sew around raw edges, then zig-zag the edge. If the fabric frays really bad, you can go over it again.
 Step 4. Cut this strip in half.
 Step 5. Open the rectangles up halfway down and pin the strips in between them with the raw edges toward the outside.
 Step 6. Sew around the large rectangles leaving an opening for turning. I indicated in the picture where I leave my opening with the thimbles. Clip the corners on an angle.
 Step 7. Turn and press. Are you seeing where an assembly line would be practical? One trip to the iron with all of them.? After you press all the edges out, I turn it up to where I want it and give it a quick press there also.
 Step 8. Sew around the three sides. Starting at the bottom, sew along the side, across the top where the straps are and down the other side. Sew a line up through somewhere on the bag to make two pockets. If you have a larger bag, you might want to make three pockets in it. Be careful where you place that line that it does not bisect where the buttons are going to be.

Step 9. Buttonholes. My machine makes the greatest keyhole buttonholes, but I realize that buttonholes can be a real challenge to some because they used to be for me. You could use Velcro or heavy duty snaps if that would be easier for you.
 Step 10. Then sew the buttons on! And that is it. They are so easy!

If you make any, please email me the pics. I would love to see what you do. These would make a great service project for your church or sewing group. They would even be a project that beginner sewers, 4-H kids and so on could do.
 Have a great day! On to my next project, little babushkas for my little Gracelyn so that her cute little blond/white head does not burn in Florida!
Step 1. Cut a piece of fabric for the straps 4 inches wide by 14 or so inches long. If you have a very lightweight fabric, you can double it or use press on interfacing to back it.
 Step 2. Cut two coordinating rectangles approximately 12 to 15 inches by 15 to 18 inches. This is very loose, you can use vary the size of them. Pin those together on the bottom and halfway up the sides.
  Step 3. Press the 4 inch rectangle in half lengthwise with wrong sides together and sew around raw edges, then zig-zag the edge. If the fabric frays really bad, you can go over it again.
  Step 4. Cut this strip in half.
 Step 5. Open the rectangles up halfway down and pin the strips in between them with the raw edges toward the outside.
 Step 6. Sew around the large rectangles leaving an opening for turning. I indicated in the picture where I leave my opening with the thimbles. Clip the corners on an angle.
 Step 7. Turn and press. Are you seeing where an assembly line would be practical? One trip to the iron with all of them.? After you press all the edges out, I turn it up to where I want it and give it a quick press there also.
 Step 8. Sew around the three sides. Starting at the bottom, sew along the side, across the top where the straps are and down the other side. Sew a line up through somewhere on the bag to make two pockets. If you have a larger bag, you might want to make three pockets in it. Be careful where you place that line that it does not bisect where the buttons are going to be.
Step 9. Buttonholes. My machine makes the greatest keyhole buttonholes, but I realize that buttonholes can be a real challenge to some because they used to be for me. You could use Velcro or heavy duty snaps if that would be easier for you.
 Step 10. Then sew the buttons on! And that is it. They are so easy!
If you make any, please email me the pics. I would love to see what you do. These would make a great service project for your church or sewing group. They would even be a project that beginner sewers, 4-H kids and so on could do.
 Have a great day! On to my next project, little babushkas for my little Gracelyn so that her cute little blond/white head does not burn in Florida!

Comments