Simple tote bag tutorial.
Are you getting tired of this fabric yet? There is a lot more of it scattered around my sewing room still.
I made this simple bag last night in under two hours. It could be any size, use your imagination. I am just using these samples and this is made working with the size that they are.
You will need:
2 - 16 x 12 inch pieces of outer fabric
2 - 16 x 12 inch pieces of interfacing
2 - 16 x 12 inch pieces of lining fabric
2 - 4 x 16 inch pieces of fabric for handles
2 - 3 x 16 inch pieces of interfacing.
1 - 3 1/2 x 13 piece of cardboard, Plexiglas, etc for base of tote. (Don't cut this yet, you will measure later to get the exact measurements for your tote.
Decorations of choice.
I used a 4 x 12 inch piece of fabric and ric rac. Be creative!
Step 1. Begin by decorating the front and/or back of your bag. I laid the 4 inch piece of fabric on the front, and sewed the edges with a zig zag stitch and then sewed ric rac over the seam.

Step 2. Iron all interfacing to the back side of all the tote pieces. The interfacing gets centered on the handle pieces, leaving 1/2 inch on each side of the handle. Make sure that you take your time and that it is pressed really well and that they are no pockets or edges left unfused.


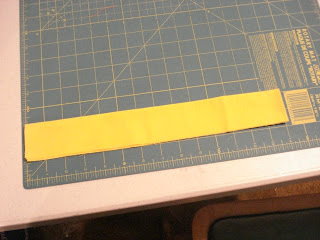
Step 3. Set aside the tote and lining pieces and press under 1/2 inch down both sides of handle pieces. Press the handle pieces in half. Top stitch down both edges of the handles. Set those aside.


Step 4. Stack the lining pieces and the front and back of the tote. Measure a 2 inch square in each of the bottom corners and mark it with a pen or pencil. Cut out the corner through all thickness.


You will do the next two steps to both the lining and the tote body.
Step 5. Placing right sides together, sew the side sides and the bottom seam of the pieces. On the lining piece, however, leave about a 3 inch opening in the bottom seam for turning.

Step 6. Press open all seams and fold the cut corners so that the seams match and sew across the corners.

Step 7. Pin the handles to the right side of the tote. I placed mine 3 inches in on both sides. Make sure that they are not going to twist. I sewed them down at this point so that I would not have to worry about holding them on the next step.


Step 8. Place the lining inside the purse and with right sides together, pin and then sew all the way around the top.

Step 9. At this point, I cut the bottom for my tote. I used the backing cardboard from the fabric sample book, and please don't gasp, that is an old rotary cutter with a bad blade that I used to cut it, NOT my good rotary cutter. Measure the size of the bottom of yours and cut it to fit.


Step 10. Turn the tote through the opening in the bottom and place the bottom cardboard inside the tote and then sew the bottom opening in the lining closed.

Finishing.
Position the bottom cardboard and give your tote a quick press and voila! a new tote in ten easy steps.

Other suggestions:
Pockets in the lining.
Pockets on the outside of the tote.
A magnetic closure snap (my lining was too soft to hold it)
Purchased handles.
Have fun and don't forget to show me what you have made with this!

Comments
You just provide so much creative inspiration...I just need to get a sewing machine that works...
The totebag is darling. Take care, ~Natalie
Great tut, and thanks for showing us.
L