Snowflake & Star Vine - Free Painting Directions

You will need:
Assorted liner brushes
#4 lettering brush
or #4 flat brush
Assorted Star and Snowflake Stencils
Cosmetic Sponge Wedges
Decoart Americana
Black
Khaki Tan
Slate Gray
Bleached Sand
Light Cinnamon
Surface of choice, basecoated Black.

As always, these are suggestions.
Get something close and don't worry if they are not EXACTLY
the same colors.

I am always perusing the stencil aisle in any craft shop.
There are well used stencils hanging all over the bulletin board in my painting room.
You can't beat a stencil for adding perfect shaped stars to a project.
You can always shade and highlight them to make them look painted,
but it sure is a lot easier to stencil them than to try to draw or trace them.
There are quite a few snowflake ones hanging there also.
Yours don't have to be the same,
get creative!
I love cosmetic wedges for stenciling.
Just a little hint,
the ones from Dollar Tree are not quite dense enough.
Upgrade to the discount chain ones.
Frugal as I am,
I let them dry and then cut off the hard part and use them again and again.
It's the hoarder in me.

With a mix of Black and Slate Gray,
stencil the biggest stars here and there on the back ground.
Make them run over the edges and keep them random.
Vary the values in the mix of paint.

I like to have several liner brushes to vary the thickness and the look of the vines.
Experiment.
With a thicker liner loaded with thinned Light Cinnamon,
wiggle in your first vine.
Pick up Khaki on the brush and highlight the vine here and there.

With a finer, smaller liner, weave more vines in with thinned Black.

With thinned Khaki on the #4 brush,
paint in the leaves.
For those of you unfamiliar with stroke work,
these are just a stroke of pushing your brush down and lifting it up and pulling it toward you
with a quarter twist.
Practice, they are really not hard.

Paint them in decreasing size to look like wheat.

Using the thin liner,
loaded with thinned Khaki and Bleached sand,
connect the leaves.

With Bleached Sand and Slate Gray,
stencil in some small stars
here and there.
(Isn't that a nice fingernail? I would like to say they are not always like that,
but I can't...constantly scrubbing paint out from under them!)

I tape out my stencils to suit where I want to use them.
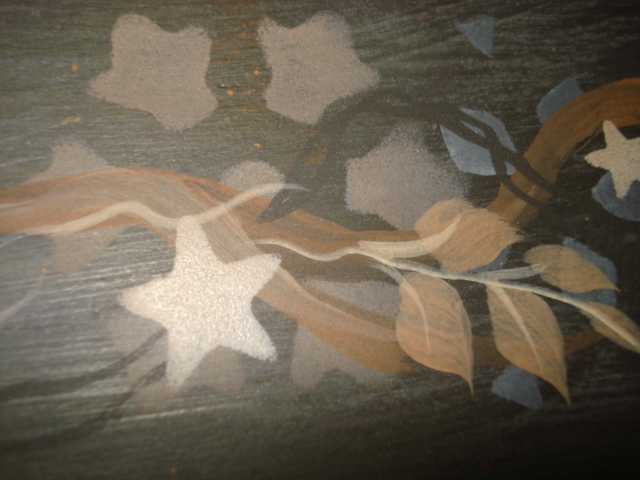
So now you should have something that looks like this!

Now with Bleached Sand
and a finer, smaller snowflake stencil,
add some more snowflakes along the vine.

Then with a stylus, pen or the other end of the brush,
add dots of Light Cinnamon,
then Khaki,
then
Bleached Sand.
A little tip on this is make a new puddle of paint to dip out of.
If your paint is starting to dry,
your dots will be all wonky.
And there you have it.
Sound easy?
Just another hint.
If you don't have snowflake stencils,
or just want this for all year,
it could be done with bigger stars in the background
and smaller ones in the front.
Make it your own.
Just remember,
you are welcome to share these directions,
pin them,
anything.
Paint this, sell it, give it away,
just don't take the directions as your own.
and
PLEASE
send me pictures of whatever you do with this!

Comments
Though I know mine would look nothing like that! LOL!
Carmen and the Primcats
Teresa's Heartfelt Stitches
You do make it look so easy Cathy!
Wishing you a great day~
JoAnn
Thanks for another wonderful tutorial! I can't wait to try this one also. I better get my sheep finished first, then again, I am one to have 100 projects going at once! Enjoy your day! It's snowing, raining, sleeting, windy, cloudy, and cold here. Good day to be crafting! It's my day off from work!
sandraallen260@centurytel.net