String Quilts Tutorial

Ok, so the disclaimer on this would be:
This is coming from a person (me) that is truly not a quilter!
So, that can go two ways as I see it.
If you are a quilter, look for a better tutorial.
If you are not a quilter, you will see that even a non quilter can do this!
My mom has been making these for awhile.
Most of these directions are hers.
She is a quilter,
an awesome quilter!
The parts that probably are not right, are my shortcuts.
I am all about fast and instant gratification.
I didn't get that from her.
(or my dad, which leads me to believe it was some long lost grandparent that was as impatient as I am)
But enough of those genetics.
These are fantastic stash buster and quite fun and fast.
There's that f word again....fast!

I am going to set mine together in squares like this
with a dark color border on every square.
And honestly,
in my crafter ADD personality,
who knows when that will happen.
Let's be honest!

So. let's get started.
You will need:
scraps of fabric
rotary mat
ruler
rotary cutter
sewing machine
a magazine or sale flyer
(great recycling)
leftover spools of thread
sewing supplies.
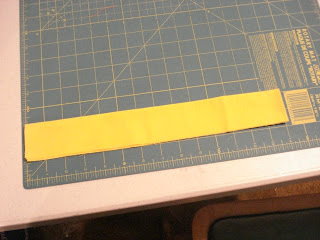
Start by cutting strips of fabric.
I cut 2 1/2 strips down to 1 inch strips
and
all increments in between.
I stack the fabric to speed up the process.

You should have something that looks like this.

I keep throwing them in a bin.

Next, take a sale catalog or magazine
and

cut pages into 8 inch squares.
(Mom does 8 1/2 inch squares here, sews them and then trims them
to 8 inches when she is done.)
Did I mention she is also way more precise than I am?
Again, where did those genetics go?

I then lay the ruler diagonally on the paper
1/4 inch to one side of the diagonal center
and mark it with a Sharpie.
(pens don't work will on the catalog pages)

Place one strip right side up
raw edge at the line
and a second strip right side down
on top of it
and pin.

And then pin about 12 more because
again,
fast
and
instant gratification!

Take them to the sewing machine and sew them.
I run one right on to the other
factory style.

Then press them apart and
you should have something that looks like this.
I don't trim after every strip,
I keep adding strips
and
trim
every few.
Go back to your machine,
place that tote of strip right beside you
and sew another strip on each side of what you just did,
right sides down (together)

Press
and then
turn it over and trim right against the paper
being careful not to trim the paper.

You should have something that looks like this.

Keep sewing strips

until the paper is covered.

Trim one last time!
Now you have the start of a string quilt.
Right now I am just making the blocks.
I am really trying hard not to buy anything until I use up
some of the stuff I have here.
Plus, I am rushing on to my next project and that is redoing
a bedroom and moving my sewing room to it.
Right now, my sewing room is in the biggest bedroom,
other than ours
in the house.
I will be moving it to the smallest bedroom,
which of course will require some
downsizing/organizing/purging.
Today,
I am buying the paint.
I am seeing a soft yellow ceiling,
white walls, white trim
and
black accents
and
organization!
I think that the color scheme is doable.
Organization?
Not sure.
I will keep you posted!

Comments
Happy New Year!
Confused???
Lois