Posts

Showing posts with the label free painting directions

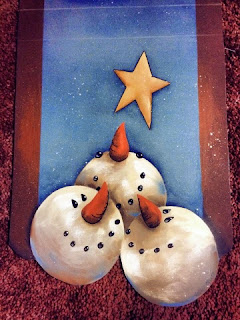
Another Snowman Tutorial - Free Painting Pattern
Image
Before you cringe and run the other direction, get ready... there is no pattern.  C'mon, you can do it,  it's just circles.... really.  You want to cut a piece of  Roclon Multipurpose Cloth,  roughly 10 x 18   I always cut them a little bigger,  paint over the edges and then trim it last.  I used a quart paint can for the circles   Overlap them on the bottom a little. Trace another line in 1 1/4 inch in  on each side.  These are the blues that I used  Sprinkle them on liberally and paint them in.  Everyone's background will be different.  Beautiful!   Don't overblend.   Allow that to dry.  Sand lightly. Next you will need these colors.  You can use a stencil for the star or freehand it  Trace in the circles again and  add the noses and  let's basecoat  everything!  ...

Thumbprint Sheep Tutorial

Image
Ok,  how easy is this? A great project for kids,  for adults,  for a quick gift,  for  last minute craft projects.  Trust me....EASY! You will need: Acrylic Paints (the colors I used are shown below) Some surface, basecoated. Round brush Liner...or Ultra Fine Sharpie if liner brushes cause you stress.  Your thumb!  These are the Decoart colors that I used.  Start with the graphite or dark gray. Lay your thumb in it  and  pounce it out on your palette until it dries up a little.  Thumbprints all around.  With the round brush, lay in a little grass under the sheep.  Then do the same with your thumb and the off-white paint right on top of the graphite ones.  Add some fun little  legs  and  heads  and tails. A few dots with a pen tip to look like flowers.... and  viola!...

Drapery Lining Pennant Tutorial

Image
  First of all, I bought this drapery lining thinking it was the Roclon product that everyone is painting on.   It was not.  So it was tossed into the stash.   In the archeological dig that I am calling Painting My Way Out Of My Paint Room , I unearthed it. In the middle of the night, it came to me... Pennants!   So here is what I did. Made a template.    Vinyl flooring makes the greatest patterns!   You can choose what size you make, it's pretty simple fourth grade geometry. Make sure that you make that little area on the top to fold over. Trace them onto the fabric. Now I know that I could have utilized this better by making them go both ways. But honestly, I have lots and it was cheap. You can see that I started alternating them and then thought, "why?" Paint them your choice of colors, painting right over the lines.   Because really, staying in the...

Circle Snowmen, Part One

Image
You will need: A surface (of course) I find that it is easier to do a wet on wet blending technique on canvas. Anything with a "tooth" will work though and canvas suitcases are a great surface to work on.  Wet on wet blending on smooth surfaces gets a little trickier so when you are starting or practicing this technique, look for something that will make it easier.   Those inexpensive canvas boards are a good way to start. Now back to what you will need: Circle Template (or two) Pencil, of course Chalk pen or chalk (not pictured) Paint and Brushes.   Ok, so I am pretty loose where it comes to paint colors. Look for ones that blend together nicely and experiment. I have done these in browns also. Light Cinnamon, Bleached Sand... White.   Brushes. I really like a filbert for these. It is already rounded and doesn't make hard edges in your blending as a flat would. That being said, I have painted a l...

Snowmen Tags and Magnets

Image
  Memory! Where does it go?   I decided it was time to update my blog and I found these pictures all ready and waiting for directions. So here goes.   I know that they are a little unseasonal but they were on the top of my painting pile waiting to be finished. With sealer/white glue/modge podge adhere the paper to the tags.   I have used an old hymnal, scrapbook paper will work as well. Don't have an old hymnal? If you send me your mailing address, I will send pages to you. How easy is that?   When they are dry, sand them and antique them with some dark chocolate acrylic paint thinned down.    I use water, faster drying time and they are small. Anything much bigger than these tags, I use extender in my paint for antiquing.   With Light Cinnamon, paint in three circles.   C'mon, did you think I was going to give you a pattern for this? Don't forget a little...